2019-02-06 QGISのプラグイン(PosiView)を使って、移動体のリアルタイム表示をする
QGISのプラグイン(PosiView)を使って、移動体のリアルタイム表示をする
(display
real-time mobile objects using QGIS plug-in (PosiView) )
Date
- 2019/02/06
Data
1.背景(Background)
-
■最近QGISを頻繁に使うようになった
(Recently I have used QGIS frequently)■「QGISで交通シミュレーションのビューアが作れたら、楽できるんだけどなー」とか考えるようになってきた
(I came to think that "if I can make a traffic simulation viewer with QGIS, it is easy")■QGISのプラグインを探していたら、"PosiView"が使えそうなことが判ってきた
(When I was looking for a plugin for QGIS, I found out that "PosiView" might be useful)
2. What's "PosiView"
■複数のオブジェクトや車両を追跡し、それらをキャンバス上の形状や点として表示することができるQGISのプラグイン
(PosiView tracks multiple mobile objects and vehicles and displays their position on the canvas)■GPS、USBLシステムまたは他のセンサーのような装置から通常NMEA-0183フォーマット等で提供される位置データを受けつける
(The Plugin reads usually NMEA formatted data from USBL or other navigation devices and displays the object as scaled symbol on the canvas.)■これらのデバイスへの接続は、TCP/UDPによって行うことができる
(Connection to those devices is established by data provider connecting to network sockets (UDP/TCP))
~ https://plugins.qgis.org/plugins/PosiView/
~ https://github.com/jrenken/qgis-PosiView/blob/master/help/source/index.rst
3. 問題点(Problem)
■私は、シミュレータから出力される位置情報をリアルタイムで表示したかった
(I wanted to just display the position information of realtime simulator)■ところが、PosiViewには、このような低機能なパーサーが実装されていなかった
(However, PosiView did not have such a low function parser)
4.対応
■"PosiView"の作者である、イェンス・レンケンさん(Mr.Jens Renken)にメールでご相談してみた
(I asked Mr. Jens Renken, author of "PosiView", for help with e-mail)- ■新しいパーサーを追加して頂いた(Mr. Jens Renken was kind enough to make a new parser and add it)
5.設定例(Setting example)
- 以下、実際に動かした例をそのまま表記する
(The following is a example actually moved ) - A.準備編(Preparation)
-
(Step 1) postGISに"k11.osm"をインポートしておく
(Import "k11.osm" into postGIS)-
柏市周辺
(Around Kashiwa city) -
インポート方法はこちら
(How to import)
(Step 2)プラグインPosiViewをインストールする
(Install plug-in PosiView)QGIS→プラグイン→プラグインの管理とインストール→全て→検索欄に"posiview"と入力→posiviewを選択→プラグインをインストール
(QGIS → Plugins → Manage and install plugins → All → Enter "posiview" in the search field → select posiview → Install plugin)
(Step 3)
- ~ https://cloud.marum.de/s/tp2D2s5poPE3doS
- ■から、"PosiView_custom_parser_2.zip"をダウンロードして解凍
(Download "PosiView_custom_parser_2.zip") -
■解凍したものを
(unziped files)-
■QGIS2の場合は
(In case QGIS2)- C:\Users\(username)\.qgis2\python\plugins\PosiView\dataprovider\dataparser
-
■QGIS3の場合は
(In case QGIS3)C:\Users\(username)\AppData\Roaming\QGIS\QGIS3\profiles\default\python\plugins\PosiView\dataprovider\dataparser
-
-
■にある、
-
■"__init__.py" を上書きして
(Overwrite "__init__.py")■"parser_test.py" を追加する
(Add "parser_test.py")
-
(Step 4)
-
■QGISを再起動する(Restart QGIS)
(Step 5)データ送信用のテストプログラムをダウンロードする
(Download test program for data transmission) -
-
- B.設定編(Setting)

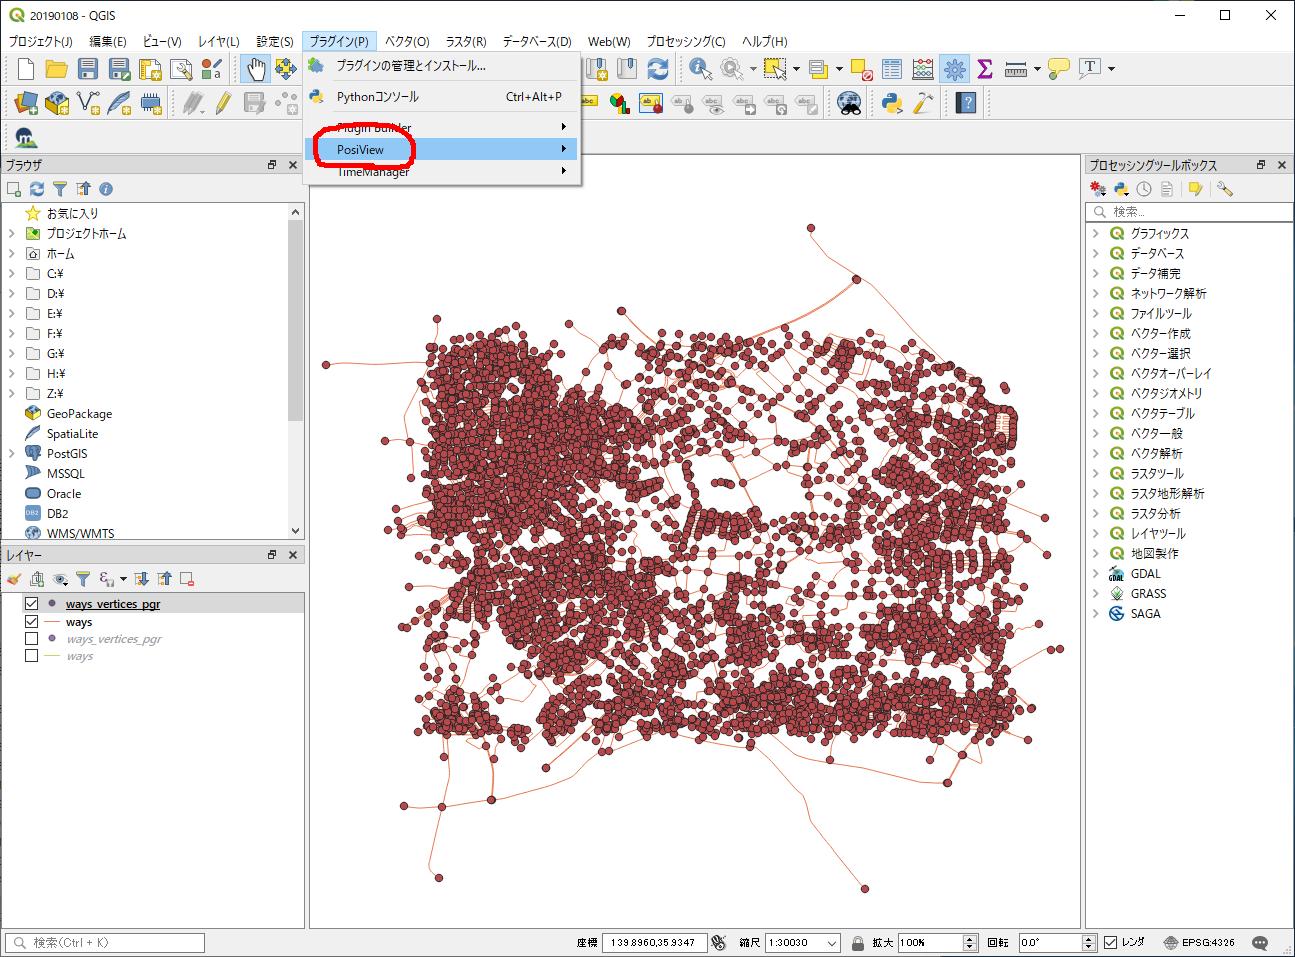
■を選んで、"Enable posiview"を選択
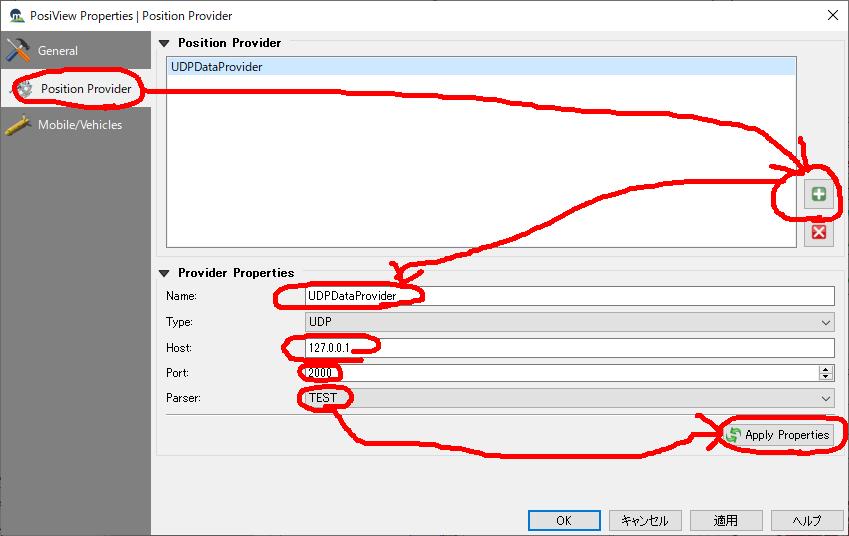
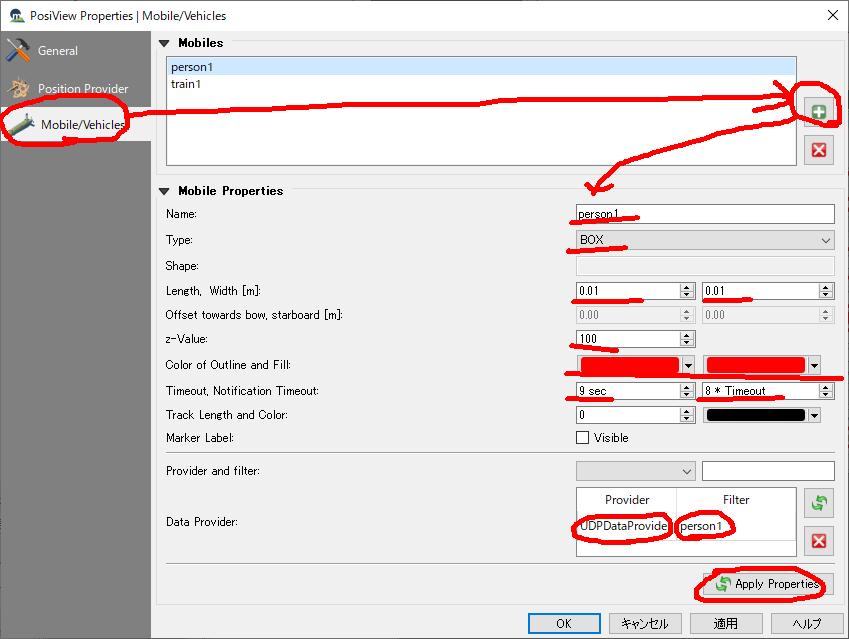
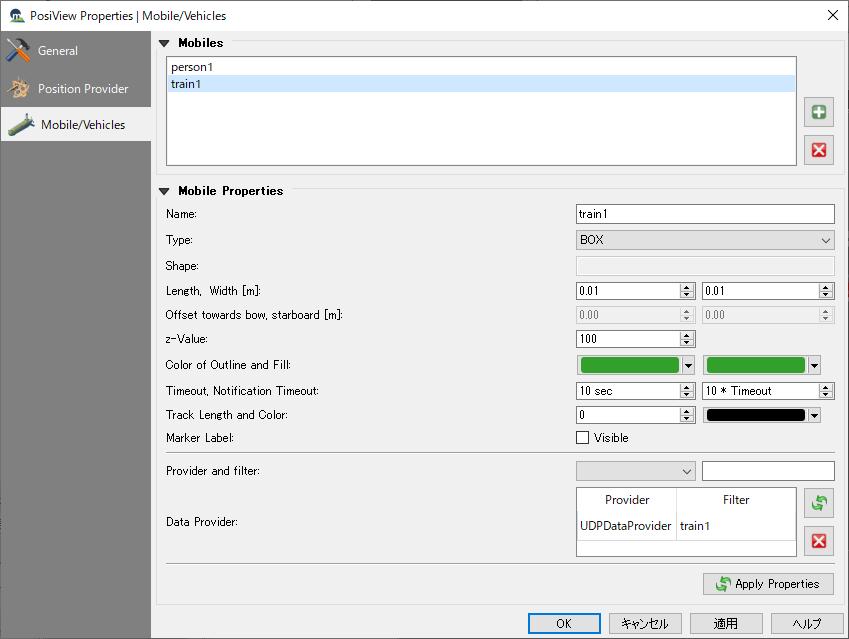
(Choose "Enable Posivew")■再度、プラグイン→"PosiView"→"Configure PosiView"を選択
(Again, select plugin → "PosiView" → "Configure PosiView")


- C.実行編(Execution)
■プラグイン→"PosiView"→"start/stop tracking"を選択
(Plug-in → "PosiView" → select "start / stop tracking")■コマンドプロンプトから ">python2 udp-client-loop.py" を投入
(From the command prompt, enter "> python 2 udp - client - loop.py")
6. 実行結果(動画)
(Execution result (movie))